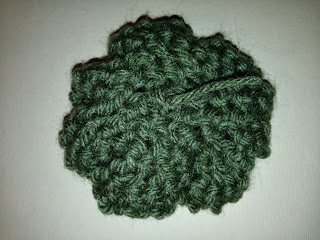
This is one of those rare posts I promised during the introduction where I will get specific about how I make something.
(Note: I'm having trouble fixing the formatting for the pictures at the bottom, but I think you'll be able to understand what they're illustrating...)
Please don't take this to mean there is only one way to make a Travel Mercy! Indeed, no two ever should or could look exactly the same. I've made hundreds - some fancy, some plain. They are as different as the people who carry them. Mine have three things in common:
1. Materials
Up to this point, I've used some form of yarn, but I'm considering expanding my repertoire, possibly using rope or video cassette tape (the latter is some tough stuff to crochet!). Mine also have eyeballs. Initially I tried gluing them on, but they didn't stick very well, creating a choking hazzard. When I got serious, I searched Etsy for supplies and found folks who sell "safety eyes" with locking washers on the back - the same kind you use to make stuffed animals. My source is Clara at 6060. She is great about filling my special orders quickly for what I consider to be a reasonable price.
2. Method
I crochet Travel Mercies. It would probably work to knit them, but since I don't know how to knit, I can't be sure. I intend to learn some day. I tried teaching myself a few years ago on a long road trip between Albuquerque, NM, and Montgomery, AL, but I was not impressed with my results. Before you ask, no, I was not driving during the experimentation.
3. Motivation
Every Travel Mercy is made with love, and they are meant to be shared in love. It is my feeble attempt to reflect the love God shows me - a way of blessing others however I can. I want them to bring joy, but I'm sure I get more than I give!
For those of you who don't crochet or are trying to learn, this is about as easy a project as you could ask for. All you need to know is the chain stitch, the single crochet, and how to tie a simple knot. The rest is just math and the elegant simplicity of hyperbolic crochet. It's a real thing. You should look it up... or just wait until I blog about it eventually.
Anyway, here's how I do it:
1. Chain 4 stitches, and use a slip stitch to make them into a loop.
 |
| 4 Chain Stitches in a Line |
| 4 Chain Stitches in a Loop |
 |
| 8 Single Crochet Stitches in "Row 1" |
3. Keep going around and around the loop. I suggest not worrying about the number of rows and total stitches you do. Each time around you will be doubling the number of stitches in the previous row. As you do, the piece will begin to "buckle."

4. Once the piece is as large as you want it to be, you use what I call inverse hyperbolic crochet. Instead of putting two single crochets in each stitch, put one single crochet in every other stitch to begin closing the project.

5. When you get down to a hole just big enough to put your thumb through, stop, and select the eyes.

6. Flip the piece to look at the front. If you haven't done so before now, use your hook to pull the loose yarn from the original chain of 4 into the piece; give it a gentle tug if there's a lump. Place the eyes in a good location. When the Travel Mercy looks right to you, secure the locking washers by taking them through the hole in the back and pushing them onto the eye posts. They should be snug but not too tight.

7. Finish closing the back by doing a slip stitch in every other stitch until the hold is gone. If you were to continue with single crochet, the yarn would come to a peak, and the back would not lie flat. If you start the slip stitches too soon, the yarn will look stressed, and holes will form on the back side of the project.
8. Finally, tie an overhand knot, pull it tight, and use your hook to pull the excess yarn into the project, making sure everything is flat.

I hope these instructions and pictures are helpful.
God bless,
Matt


No comments:
Post a Comment